
Systems Manager Installation using Active Directory GPO
In large environments, it isn't time efficient to install software on individual PCs one at a time. In order to perform tasks like deploying the Systems Manager agent in bulk, administrators of Windows environments with Active Directory can make use of Active Directory Group Policy Objects to administratively push software out to a large number of devices.
For more information on GPOs, requirements, and any Microsoft or Active Directory questions, please consult Microsoft's documentation for software installation using Active Directory GPO.
This article will cover the steps required in a typical Active Directory environment to push out the System Manager client for Windows to devices across an AD domain.
- Choose your Systems Manager network from the Network drop-down, then go to Systems Manager > Add devices > Windows.
- Download the Windows installer image by clicking on the Download link and saving the .msi file
- Move the .msi file to a shared location that is accessible by all target devices; in this example, it's a "Software" folder on a file server.
Agent version 1.0 - 3.0.3
- On a domain controller, start the Group Policy Management tool.
- Navigate to [your_company_name]-Computers, right-click, and choose "Create a GPO in this domain and link it here..."
- Give the GPO a name, for example "Systems Manager" or "Meraki Systems Manager"
- Under "Group Policy Objects", find the GPO you created in step 3, right-click on it, and choose "Edit..."
- In the window that pops up, navigate to "Computer Configuration" to "Policies" to "Software Installation"; right-click it and choose "New" and "Package..."
- Browse to- or type the full path of the .msi package on the share.
- In the "Deploy Software" window that pops up, leave the setting option to "Assigned" and click OK
Agent version 3.1.0+
To deploy Agent v3.1.0+ via GPO, administrators will need to create and distribute a transform file (.mst) with the Agent package. The transform file defines the SM network environment the Agent will connect to after installation.
Transform files can be created in a variety of different msi editing tools. Steps to create a transform file in Microsoft Orca are outlined below.
Create transform file in Orca
- Open Orca. Click File > Open in the main toolbar, and open the Agent installer .msi (SMAgent-x.x.x)
- In the main toolbar, click Transform > New Transform
- Select the Property table from the list on the left, then click Tables > Add Row in the main toolbar
- In the Property field enter ENROLLMENT_CODE (case sensitive). In the Value field, enter your network enrollment ID or network enrollment string
- In the main toolbar, click Transform > Generate Transform. Name the transform file and save it to a network share folder that is accessible by all target devices
Deploy transform file with GPO
- On a domain controller, start the Group Policy Management tool.
- Navigate to [your_company_name]-Computers, right-click, and choose "Create a GPO in this domain and link it here..."
- Give the GPO a name, for example "Systems Manager" or "Meraki Systems Manager"
- Under "Group Policy Objects", find the GPO you created in step 3, right-click on it, and choose "Edit..."
- In the window that pops up, navigate to "Computer Configuration" to "Policies" to "Software Installation"; right-click it and choose "New" and "Package..."
- Browse to or type the full path of the .msi package on the network share
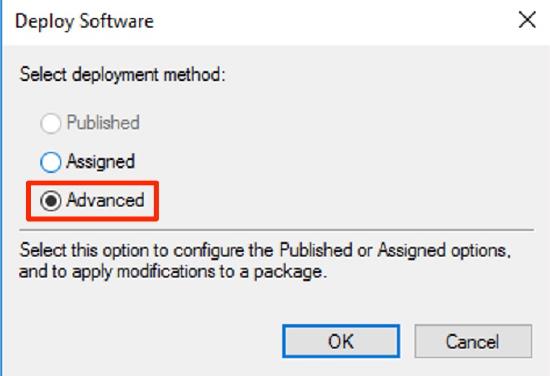
- In the Deploy Software window, change the setting option to Advanced
- In the Properties window, click the Modifications tab, then click Add
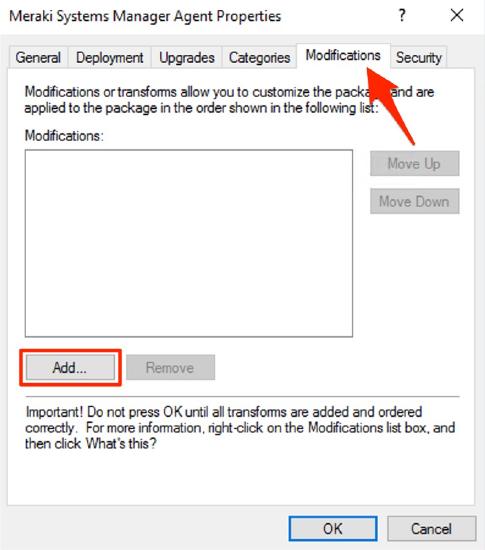
- Select the Transforms (*.mst) file from the network share location, and click Ok

Initiate Deployment
- Right-click the entry you created and enable "Enforced"
- Start a shell by clicking on the Start button (then "Run..." on some versions of Windows") and typing "cmd"
- In the cmd shell that pops up, type "gpupdate /force"
- Wait until gpupdate completes. You are done.